Archive for the ‘Images’ Category

Gazopa – Upload images and search similar images

August 31, 2010

Let us assume you want to know the birth place of Tom Cruise. What you will do..? You will Google it and explore those information related pages. This is the normal way of using Google – using key words for information searching.

Now let us assume you have a picture of an unknown person and you are interested in knowing his/her name and other details. How will you use Google..? I have thought of suggesting Google to do some research on this area.

Now let us assume you got an image, say a Close button and you would like to see a similar image of bigger/smaller size without using keyword search. That is rather than using “Close Button small in size” keywords in the Google search tab, you would upload the reference image and view similar images – big or small, red or blue. How does it sound..?

Yes, it is possible.  

  1. Go to http://gazopa.com
  2. Click the Upload tab and browse the image from your system and hit the Enter button in your keyboard (by the way, there is no Submit button for this purpose, just saying).

You will see a lot of pages with similar images of your reference image. But this technique doesn’t works out for human faces (or at least in my case). 🙂

Also you can give an image URL to search for similar images  or

If you are good at drawing, test your hands by drawing an image and upload to see similar images.

I think it will be quite useful for graphic/UI designers and lone technical authors who are jack of all trades (but master of none like me). 🙂

Technical Writer’s Role in UI Design

November 20, 2009


User Interface (UI) designing is no longer been a developers cup of tea nowadays. In most cases, it is the Technical Writer who becomes the first person to explore an application/product. As a result, a TW will be in a better person to tell his UI experience with the application/product in user point of view.

Being an individual contributor in my company, besides technical authoring, I almost wear multiple hats:

  • UI Design Advisor
  • Beta Tester
  • Product Trainer for the Beginners/Fresher.

Recently, I happen to test one application. Surprisingly, I was not a part of the team in the UI designing phase. An UI designer inside me came out while testing that application. Besides functionality testing, I started listing down UI design suggestions (Please note that they are only suggestions not advice). Look out the below image which bothered me a lot.

Bad UI Design

What is the necessity of placing a Close button below the Close icon already available by default..?

To be honest, for me it doesn’t makes any sense. Any UI should be designed keeping the User in mind no matter he is an advance or novice user. UI design should be in such a way that it should guide the user to explore the product without making him to press F1 often. You need not to design a colourful UI but definitely not a clumsy something like this:

Complex UI Design

      (Picture courtesy: Tom Johnson’s http://Idratherbewriting.com)

Things to do before using the Captivate

November 18, 2009

 I always rely on Adobe Captivate (before it was Macromedia Captivate) for preparing training materials, tutorials and demos. It is simple to handle as well as effective in covering your clients training needs. Not only you can customize the call-outs and standard messages, but also it gives a real effect of exploring your product/application.

There are few pre-requisites before you start on with captivate.

Close your Outlook and Instant messenger services without any second thought. Whenever you get a new email, outlook will show a pop-pop alert. Captivate will capture those pop-ups also along with your regular actions in the application. So as a result, your client will come to know that your mailbox has exceeded its limit through your training demo.

Captivate captures your Outlook pop-ups

Never open or explore any applications, folders when you are capturing with the Captivate. Reason is same as mentioned above. Otherwise be ready to redo your capture.  🙂

Ten important Points to Remember While Creating an Online Help

October 15, 2009


I started testing my hand with online help three years before. From then, it’s always my favourite cup of tea. There are a lot of room for logical and analytical thinking in an online help. While reviewing an online help, few points came into my mind which I believe are very vital for an online help. Here we go:

1)  Know your needs

Rather than saying know your needs, I’d say know your client’s need. The fact of being you a RoboHelp guru, it doesn’t mean that your client should be happy to accept a webhelp output from you. He may be comfortable with a .chm file. But make sure your learning curve doesn’t get affected by your client’s preferred Help Authoring Tools (HAT).

2)  Track back often with your Developers

Once the application development stage moves to freezing point, you may start your online help. But still few UI changes may occur. So better you track your developers’ path to avoid any last minute confusion.  Any client will wish to read an updated (including images) online help.

3)  Learn HTML before you start

Though you have WYSWYG environment nowadays, it’s always better to learn some html tags before you start. Most of the HATs’ will add their own junk codes. If you’re html literate; it’s easy for you to fix it in later stage.

4)  Design your Style sheet first

Before getting started with your online help, you make sure you have a standard, well defined style sheet in hand. In the middle of the process, re-thinking about a table header column style is not a wise idea. List your needs and in rare case you can include a new style (only in rare case, don’t make it a habit).

5)  Analyse and freeze your TOC

Before starting an online help, it’s always recommended that first do a research and freeze your TOC. It will help you to structure your help.  If you’re curious about single sourcing, it’s always recommended to have a structured TOC.

6)  A picture is worth of thousand words

Add images, flow diagrams in right places. But your user will get irritated with irrelevant and excess images. Showing a confirmation image with an OK button and Cancel button in the online help is not a great idea.

7)  Link the links properly

One general thumb rule for all online helps is “Write shorter, link them properly”.  Instead of writing two page lengthy instructions, give correct hyperlinks at right place. Don’t forget to include a relevant ‘See Also’ section in an online help.

8)  Add a Glossary and Index

Adding a glossary section in an online help is always a great idea. You can include smart definitions and acronyms in a glossary. Every user will like a crispy index section. Pick out mostly used keywords from every page and index it. Make sure your index keywords make sense. Adding ‘HAT’ as a keyword is a good idea than adding ‘because’ as a keyword in the index section.

9)  Hotspots and pop-ups

Giving too much of hyperlinks may sometimes backfire you. Sometimes, the user may hesitate to click your hyperlinks as he may be curious to stay within the same page. During such scenarios, introduce hotspots and pop-ups to keep your user in the same page.

10)  Get the feedback

Once your online help gets shipped with the product, don’t stay back as if you’re done with that. Try to figure out any gap between the application and your help by including yourself in the client’s feedback e-mails. You might have missed a warning message or a pre-requisite step required to fetch a row from the database.

Converting Images in SnagIt

October 9, 2009

I  have used SnagIt for more than 3 years and it is a reliable image capturing tool. Also, you can save the captured image into a number of other image formats like jpeg, gif, tif etc.

Recently I came to know that just by a right-click action, we can save an image into other formats. Here we go:

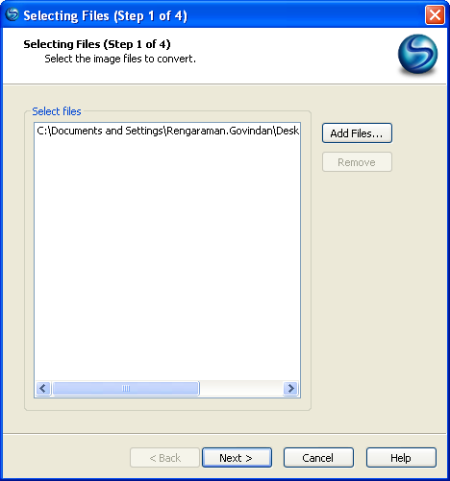
1) Right click on an image and select SnagIt > Convert Image.

Convert_image

2) Click the  next button.

Note: You can add more images by clicking the Add button.

Follow the steps and finally you will be able to save the image in your required format. Before converting the image, SnagIt gives an option to enhance the image. Sounds good..?

I thought we can convert multiple images only by using IrfanView. Now I found out that SnagIt also does this job decently.